今天开始分享一些关于Docker相关的系列文章,这也是博主学习docker的过程和相关总结,希望可以帮助到更多的人;
Docker从1.13版本之后采用时间线的方式作为版本号,分为社区版CE和企业版EE。社区版是免费提供给个人开发者和小型团体使用的,企业版会提供额外的收费服务,比如经过官方测试认证过的基础设施、容器、插件等。
社区版按照stable和edge两种方式发布,每个季度更新stable版本,如18.09,18.06;每个月份更新edge版本,如17.09,17.10。
Docker 要求 CentOS 系统的内核版本高于 3.10 ,查看本页面的前提条件来验证你的CentOS 版本是否支持 Docker 。
安装docker
1、通过uname -a命令查看你当前的内核版本
[root@VM_54_118_centos ~]# uname -a
Linux VM_54_118_centos 3.10.0-693.el7.x86_64 #1 SMP Tue Aug 22 21:09:27 UTC 2017 x86_64 x86_64 x86_64 GNU/Linux
2、卸载旧版本(如果安装过旧版本的话)
[root@VM_54_118_centos ~]# rpm -qa | grep docker
docker-common-1.13.1-94.gitb2f74b2.el7.centos.x86_64
docker-1.13.1-94.gitb2f74b2.el7.centos.x86_64
docker-client-1.13.1-94.gitb2f74b2.el7.centos.x86_64

[root@VM_54_118_centos ~]# yum remove docker docker-common docker-client
3、安装需要的软件包, yum-util 提供yum-config-manager功能,另外两个是devicemapper驱动依赖的
[root@VM_54_118_centos ~]# yum install -y yum-utils device-mapper-persistent-data lvm2
4、设置yum源
[root@VM_54_118_centos ~]# yum-config-manager --add-repo https://download.docker.com/linux/centos/docker-ce.repo
或
[root@VM_54_118_centos yum.repos.d]# wget https://download.docker.com/linux/centos/docker-ce.repo
--2019-03-23 15:41:34--  https://download.docker.com/linux/centos/docker-ce.repo
Resolving download.docker.com (download.docker.com)... 52.222.255.21, 52.222.255.113, 52.222.255.214, ...
Connecting to download.docker.com (download.docker.com)|52.222.255.21|:443... connected.
HTTP request sent, awaiting response... 200 OK
Length: 2424 (2.4K) [binary/octet-stream]
Saving to: ‘docker-ce.repo.1’

100%[==========================================================================================================>] 2,424       --.-K/s   in 0s

2019-03-23 15:41:35 (546 MB/s) - ‘docker-ce.repo’ saved [2424/2424]
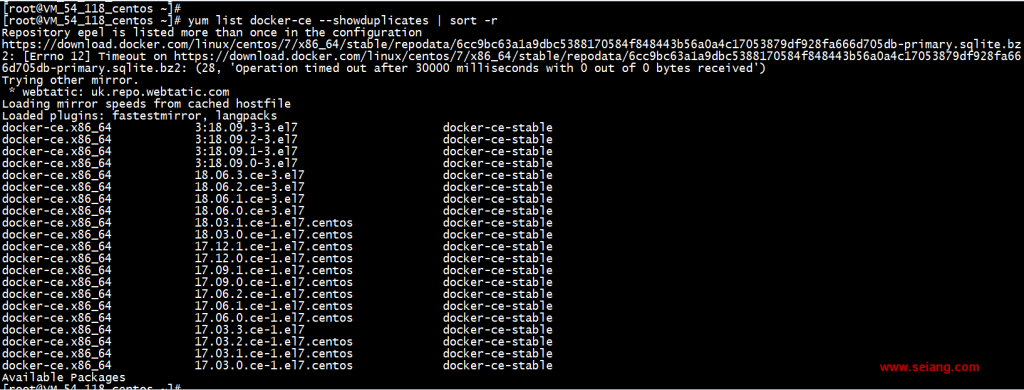
可以查看所有仓库中所有docker版本,并选择特定版本安装
[root@VM_54_118_centos ~]# yum list docker-ce --showduplicates | sort -r
5、安装docker
[root@VM_54_118_centos ~]# yum install docker-ce #由于repo中默认只开启stable仓库,故这里安装的是最新稳定版18.09.3
[root@VM_54_118_centos ~]# yum install docker-ce
6、启动并加入开机启动
[root@VM_54_118_centos ~]# systemctl start docker.service

[root@VM_54_118_centos ~]# systemctl status docker.service
● docker.service - <a href="http://www.seiang.com/?tag=docker" title="查看更多关于Docker的文章" target="_blank">Docker</a> Application Container Engine
   Loaded: loaded (/usr/lib/systemd/system/docker.service; disabled; vendor preset: disabled)
   Active: active (running) since Sat 2019-03-23 15:50:51 CST; 6s ago
     Docs: https://docs.docker.com
 Main PID: 3851 (dockerd)
    Tasks: 10
   Memory: 28.1M
   CGroup: /system.slice/docker.service
           └─3851 /usr/bin/dockerd -H fd:// --containerd=/run/containerd/containerd.sock

Mar 23 15:50:50 VM_54_118_centos dockerd[3851]: time="2019-03-23T15:50:50.953716122+08:00" level=info msg="Graph migration to content-addr...econds"
Mar 23 15:50:50 VM_54_118_centos dockerd[3851]: time="2019-03-23T15:50:50.954244203+08:00" level=info msg="Loading containers: start."
Mar 23 15:50:50 VM_54_118_centos dockerd[3851]: time="2019-03-23T15:50:50.959171152+08:00" level=info msg="pickfirstBalancer: HandleSubCon...le=grpc
Mar 23 15:50:50 VM_54_118_centos dockerd[3851]: time="2019-03-23T15:50:50.959889513+08:00" level=info msg="pickfirstBalancer: HandleSubCon...le=grpc
Mar 23 15:50:51 VM_54_118_centos dockerd[3851]: time="2019-03-23T15:50:51.106916107+08:00" level=info msg="Default bridge (docker0) is ass...ddress"
Mar 23 15:50:51 VM_54_118_centos dockerd[3851]: time="2019-03-23T15:50:51.139509120+08:00" level=info msg="Loading containers: done."
Mar 23 15:50:51 VM_54_118_centos dockerd[3851]: time="2019-03-23T15:50:51.159454415+08:00" level=info msg="<a href="http://www.seiang.com/?tag=docker" title="查看更多关于Docker的文章" target="_blank">Docker</a> daemon" commit=774a1f4 g...18.09.3
Mar 23 15:50:51 VM_54_118_centos dockerd[3851]: time="2019-03-23T15:50:51.159522447+08:00" level=info msg="Daemon has completed initialization"
Mar 23 15:50:51 VM_54_118_centos systemd[1]: Started Docker Application Container Engine.
Mar 23 15:50:51 VM_54_118_centos dockerd[3851]: time="2019-03-23T15:50:51.167549558+08:00" level=info msg="API listen on /var/run/docker.sock"
Hint: Some lines were ellipsized, use -l to show in full.

# 设置开启自启动
[root@VM_54_118_centos ~]# systemctl enable docker.service
Created symlink from /etc/systemd/system/multi-user.target.wants/docker.service to /usr/lib/systemd/system/docker.service.
7、验证安装是否成功(有client和service两部分表示docker安装启动都成功了)
[root@VM_54_118_centos ~]# docker version
Client:
 Version:           18.09.3
 API version:       1.39
 Go version:        go1.10.8
 Git commit:        774a1f4
 Built:             Thu Feb 28 06:33:21 2019
 OS/Arch:           linux/amd64
 Experimental:      false

Server: Docker Engine - Community
 Engine:
  Version:          18.09.3
  API version:      1.39 (minimum version 1.12)
  Go version:       go1.10.8
  Git commit:       774a1f4
  Built:            Thu Feb 28 06:02:24 2019
  OS/Arch:          linux/amd64
  Experimental:     false
升级docker
这种方式安装之后如果需要升级,只需要再次更新下yum包索引。
# yum makecache fast 然后继续选择需要安装的版本即可。
使用脚本进行安装
[root@VM_54_118_centos ~]# curl -fsSL https://get.docker.com | sh
或
[root@VM_54_118_centos ~]# wget -qO- https://get.docker.com

如果想要尝鲜的话,可以使用如下命令安装
[root@VM_54_118_centos ~]# curl -fsSL https://test.docker.com | sh
docker安装详细可参考官方文档:https://docs.docker.com/install/linux/docker-ce/centos/


